CreateML 101
I made this tutorial for students who had practice in the company I work. You can find the same information (and even more on Apple's website), but you also can look through that tutorial.
Let's see how to do a simple ML-based app for solving a synthetic task. It's a very primitive way of training ML-models, but, I hope, good enough for some simple tasks and typical source data.
ATTENTION: The same and even more you can find in Apple's documentation.
Usually ML pipeline looks like:
Gathering a dataset that represents your final input data and output data from your model
Selecting a model architecture fits your context in the best way.
Training the model.
Integration the trained model into your app.
1 - Gathering dataset
For that demonstration task we will use some dataset from `kaggle`. For example Arthropod Taxonomy Orders Object Detection Dataset. So, download it, unarchive and place it somewhere locally. That's enough for training classifier.
Unfortunately, CreateML can't understand any format of datasets, so you need to markup it manually using some tool (ML Highlight) or convert existing one to a CreateML format (convert_dataset.py).
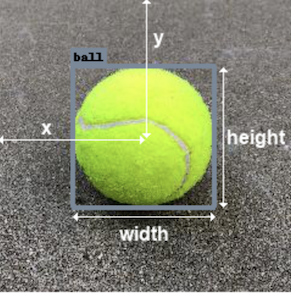
ATTENTION: x, y are coordinates of the CENTRE of your bounding.
CreateML Annotations.json looks like:
[
    {
        "image": "66179910a09e.jpg",
        "annotations": [
            {
                "label": "66179910a09e.jpg",
                "coordinates": {"x": 787, "y": 789, "width": 530, "height": 592
                }
            }
        ]
    },
    {...}
]
2.1 - Train model using CreateML
To simplify the example and our life we will use a standard Apple's models integrated into OS and will train only top-level layers using already existing layers as a feature extractor. That allows us save lots of time and space on disk.
Classification
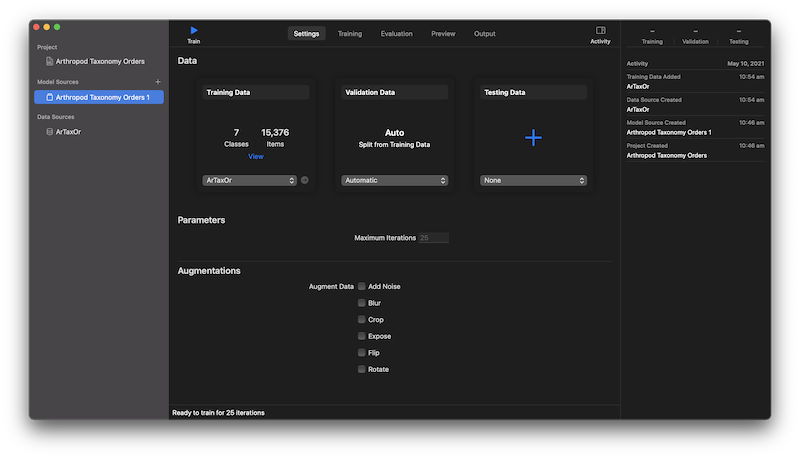
New document->Image Classification- We assume that we need to classify just by orders (without any additional things).
- So drag your dataset folder to training data (actually, it would be better to split your data on training-validation-testing).
- You can see classes (one folder - one class) in the dataset clicking on it in
Data Sources - Setup number of iterations (default is 25) and push
Start training - As your model is trained based on some standard Apple's model, it uses its low-level layers as a feture extractor and trained only high-level layers for your task. So firstly you can see
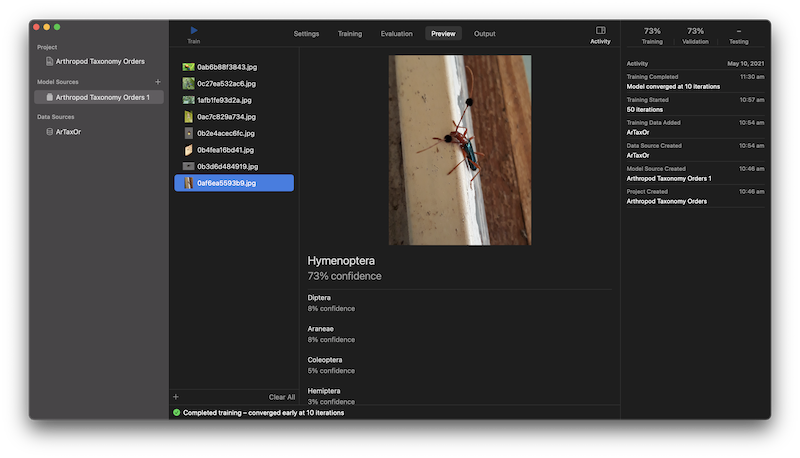
Extracting featuresand only then -Training. - When your model finish being trained - you can check, how it works in
Preview taband find that it work's actually not well. Here might be several reasons - noisy / incoherent input data, small dataset, inappropriate architecture or task-related issues. - So export your trained model to
.mlmodelfile and integrate it into your project in XCode (chapter 3).


You can also add some augmentation. Augmentation - is a process of additional distorting of input images that artificially extends trianing dataset for vary noises, sizes etc and as result allows to make model more robust and reduce overfitting effect.
Usually training process can take weeks on high-performance GPU, but we are solving pretty simple task and in our case it can take just a couple of hours)
Detection
Actually the same but you need an annotation of your source data, but training process can take longer time. Also, notice, that transfer learning (training only top level layers) is supported only since iOS 14.
Just take a cup of tea and wait for a couple of days. I would recommend making snapshots from time to time just in case if your training process will die (and just to check in `Preview` that you train what you need to train.
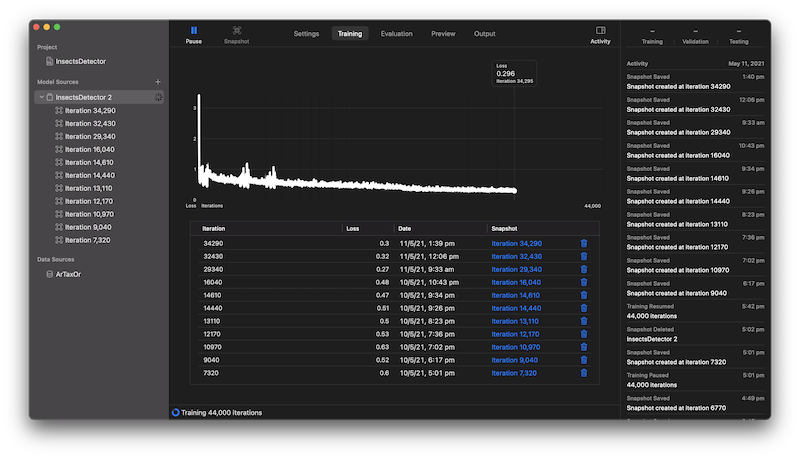
NOTE: snapshot with the smallest training loss can be just overfitted and have worse precision on non training data.
2.2 - Train model using Playground
If you want, you can also train your model manually in Playground:
- First of all you need Mac OS playground (others don't support
CreateML). - Notice, that it's almost as same as training using CreateML, but manually.
- Here we have two options: using
sessionor just train immediately. First one is more controllable and stable in terms of breaking process. Second one is much simpler. So we will use second one. - First of all you need to load your dataset:
- Let's split one on training and evaluating subsets.
- Prepare training parameters (add some augmentation and more iterations):
- Create and train classifier:
- So now we can estimate some resulting metrics (precision and loss):
- Finally sign and save your model:
let dataSource = MLImageClassifier.DataSource.labeledDirectories(at: URL(fileURLWithPath: "DATASET_PATH/ArTaxOr"))
let splitData = try! dataSource.stratifiedSplit(proportions: [0.8, 0.2])
let trainData = splitData[0]
let testData = splitData[1]
let augmentation = MLImageClassifier.ImageAugmentationOptions(arrayLiteral: [
    //MLImageClassifier.ImageAugmentationOptions.blur,
    //MLImageClassifier.ImageAugmentationOptions.exposure,
    //MLImageClassifier.ImageAugmentationOptions.flip,
    //MLImageClassifier.ImageAugmentationOptions.noise,
    MLImageClassifier.ImageAugmentationOptions.rotation
])
let trainParams = MLImageClassifier.ModelParameters(validation: MLImageClassifier.ModelParameters.ValidationData.split(strategy: .automatic),
                                                    maxIterations: 1000,
                                                    augmentation: augmentation)
let classifier = try! MLImageClassifier(trainingData: trainData, parameters: trainParams)
/// Classifier training accuracy as a percentage
let trainingError = classifier.trainingMetrics.classificationError
let trainingAccuracy = (1.0 - trainingError) * 100

let validationError = classifier.validationMetrics.classificationError
let validationAccuracy = (1.0 - validationError) * 100

/// Evaluate the classifier
let classifierEvaluation = classifier.evaluation(on: testData)
let evaluationError = classifierEvaluation.classificationError
let evaluationAccuracy = (1.0 - evaluationError) * 100
// Save model
let homePath = URL(fileURLWithPath: workPath)
let classifierMetadata = MLModelMetadata(author: "George Ostrobrod",
shortDescription: "Predicts order of insect.",
version: "1.0")
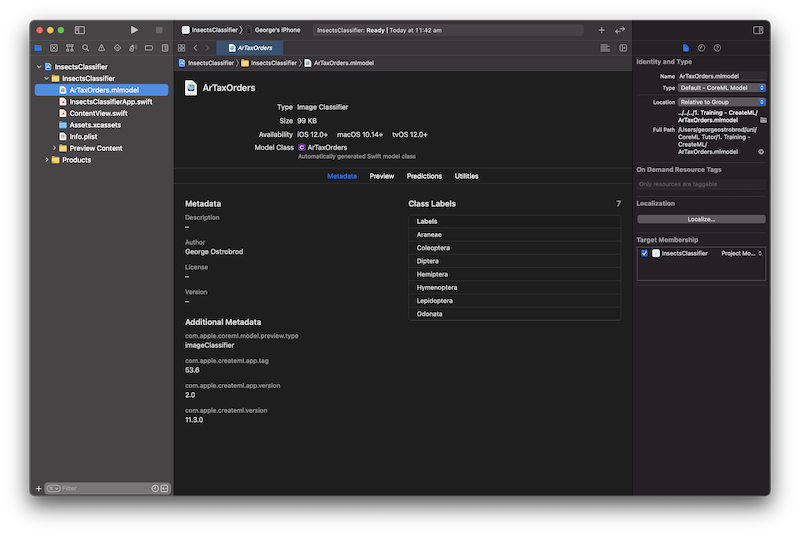
try classifier.write(to: homePath.appendingPathComponent("InsectOrder.mlmodel"),
metadata: classifierMetadata)
3 - Integration into your app
- Create (or open) your project in XCode.
- Drag your
.mlmodelfile to your project. - Add
CoreML,ImageIOandVisionframeworks. - In UI we need to add:
- an image view
- a label for results
- a button for picking image
- Set the following string keys in
Info.plist: Privacy - Camera Usage DescriptionPrivacy - Photo Library Usage Description- Pick image and call your classifier for it (part of
UIImagePickerControllerDelegateimplementation): - Selecting a source image from gallery/camera and its infrastructure you can see in demo code.
- Setup classificator (called in the next step). Here we load our model and setup a callback for processing results of its running:
- Setup request (called from image picking method). Here we call our classifier for an image:
- Setup processing of classification result (callback in request). Here we receive result of classification and process it. In this example we just show it in our label. As we use classificating model our result is
VNClassificationObservation, but for regression it would beVNCoreMLFeatureValueObservationandVNPixelBufferObservation- for segmentation or another image-to-image model: - Put your detection model into your project.
- Setup detector:
- Setup request:
- Process detecting result and draw overlay:
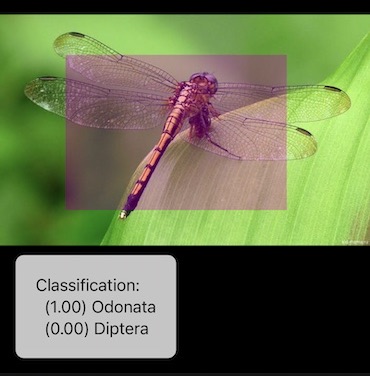
Classifier
func imagePickerController(_ picker: UIImagePickerController, didFinishPickingMediaWithInfo info: [UIImagePickerController.InfoKey : Any]) {
    picker.dismiss(animated: true)

    let image = info[UIImagePickerController.InfoKey.originalImage] as! UIImage
    imageView.image = image
    updateClassifications(for: image)
}
lazy var classificationRequest: VNCoreMLRequest = {
    do {
        let model = try VNCoreMLModel(for: ArTaxOrders(configuration: MLModelConfiguration()).model)

        let request = VNCoreMLRequest(model: model, completionHandler: { [weak self] request, error in
            self?.processClassifications(for: request, error: error)
        })
        request.imageCropAndScaleOption = .centerCrop
        return request
    } catch {
        fatalError("Failed to load Vision ML model: \(error)")
    }
}()
func updateClassifications(for image: UIImage) {
    classificationLabel.text = "Classifying..."

    let orientation = CGImagePropertyOrientation(image.imageOrientation)
    guard let ciImage = CIImage(image: image) else { fatalError("Unable to create \(CIImage.self) from \(image).") }

    DispatchQueue.global(qos: .userInitiated).async {
        let handler = VNImageRequestHandler(ciImage: ciImage, orientation: orientation)
        do {
            try handler.perform([self.classificationRequest])
        } catch {
            print("Failed to perform classification.\n\(error.localizedDescription)")
        }
    }
}
func processClassifications(for request: VNRequest, error: Error?) {
    DispatchQueue.main.async {
        guard let results = request.results else {
            self.classificationLabel.text = "Unable to classify image.\n\(error!.localizedDescription)"
            return
        }

        let classifications = results as! [VNClassificationObservation]
        if classifications.isEmpty {
            self.classificationLabel.text = "Nothing recognized."
        } else {
            // Display top classifications ranked by confidence in the UI.
            let topClassifications = classifications.prefix(2)
            let descriptions = topClassifications.map { classification in
                return String(format: "  (%.2f) %@", classification.confidence, classification.identifier)
            }
            self.classificationLabel.text = "Classification:\n" + descriptions.joined(separator: "\n")
        }
    }
}
Object detection
lazy var detectionRequest: VNCoreMLRequest = {
    do {
        let model = try VNCoreMLModel(for: InsectDetector(configuration: MLModelConfiguration()).model)

        let request = VNCoreMLRequest(model: model, completionHandler: { [weak self] request, error in
            self?.processDetection(for: request, error: error)
        })
        request.imageCropAndScaleOption = .centerCrop
        return request
    } catch {
        fatalError("Failed to load Vision ML model: \(error)")
    }
}()
func updateDetector(for image: UIImage) {
    let orientation = CGImagePropertyOrientation(image.imageOrientation)
    guard let ciImage = CIImage(image: image) else { fatalError("Unable to create \(CIImage.self) from \(image).") }

    DispatchQueue.global(qos: .userInitiated).async {
        let handler = VNImageRequestHandler(ciImage: ciImage, orientation: orientation)
        do {
            try handler.perform([self.detectionRequest])
        } catch {
            print("Failed to perform detection.\n\(error.localizedDescription)")
        }
    }
}
var overlays = [UIView]()
/// Updates the UI with the results of the classification.
func processDetection(for request: VNRequest, error: Error?) {
    DispatchQueue.main.async {
        guard let results = request.results else {
            return
        }

        for view in self.overlays {
            view.removeFromSuperview()
        }

        let detections = results as! [VNRecognizedObjectObservation]
        for object in detections {
            print(object.labels[0])
            let objectBounds = self.detectedRectToView(object.boundingBox)

            let view = UIView(frame: objectBounds)
            view.backgroundColor = UIColor(displayP3Red: 1.0, green: 0.0, blue: 1.0, alpha: 0.25)
            self.overlays.append(view)
            self.imageView.addSubview(view)
        }
    }
}
4 - Result app