Introduction to WebGL Background
Here I tried to describe how to prepare your page for using a WebGL-based background. So you need to implement only four parts:
CSS
Here we need to implement a class places your canvas in the fixed position under all other elements:
.canvas {
  display: block;
  top: 0;
  left: 0;
  position: fixed;
  z-index: -100;
}
Our canvas must fit a browser's window size:
canvas {
  width: 100vw;
  height: 100vh;
}
HTML
Here you need just to include the following code in your page body:
<div class="canvas">
    <canvas id="glcanvas"/>
</div>
We use glcanvas ID to link it to our future WebGL context.
OpenGL Shader
You can store your shaders in the HTML as a script with types x-shader/x-vertex and x-shader/x-fragment, in separate file or just in JS code. In the current example we will store them in the HTML. Below are vertex and fragment shaders.
Vertex shader (computes each passed vertex):
<script id="vertex-shader" type="x-shader/x-vertex">
attribute vec2 aVertexPosition;
attribute vec2 aTexturePosition;


varying vec2 tPos;

void main() {
    tPos = aTexturePosition;
    gl_Position = vec4(aVertexPosition, 0.0, 1.0);
}
</script>
attribute vec2 aVertexPosition;- a vertex position. Usually it is a vector of 3 or 4 floats, but as we produce 2D example, 2 floats is enough.attribute vec2 aTexturePosition;- a texture position. A point of a texture that's corresponding to the current vertex.varying vec2 tPos;- the output texture position.varyingmeans that the value is interpolated between vertices.tPos = aTexturePosition;- we just pass a value of an input texture coordiantes to output.gl_Position = vec4(aVertexPosition, 0.0, 1.0);- we pass input vertex position as is, but appendzandwvalues.
After computing of each vertex, WebGL makes rasterization step and calls a fragment shader for each pixel. In our case it produces a colour gradient:
<script id="fragment-shader" type="x-shader/x-fragment">
#ifdef GL_ES
    precision highp float;
#endif


varying vec2 tPos;

void main(void) {
    gl_FragColor = vec4(tPos, 0.0, 1.0);
}
</script>
precision highp float;- set precision of float calculations (higher - slower but more precise).varying vec2 tPos;- our texture position from vertex shader (already interpolated).gl_FragColor = vec4(tPos, 0.0, 1.0);- draw a gradient represents texture position.
JavaScript
It is the biggest part. Here we need to prepare WebGL context, canvas, build shader programs and manage drawing.
First of all we need to initialise WebGL context and canvas (I provide now only functions, we will build them together a bit later):
let gl = null;
let glCanvas = null;


function initwebGL() {
    glCanvas = document.getElementById("glcanvas");
    gl = glCanvas.getContext("webgl");
}
Since OpenGL 3.2 and OpenGL ES 2.0 (WebGL is actually the same), you can draw only with shaders. So the next step is to compile shaders and build a shader program (it needs both vertex and fragment shaders).
function compileShader(id, type) {
  let code = document.getElementById(id).firstChild.nodeValue;
  let shader = gl.createShader(type);

  gl.shaderSource(shader, code);
  gl.compileShader(shader);

  if (!gl.getShaderParameter(shader, gl.COMPILE_STATUS)) {
    console.log(`Error compiling ${type === gl.VERTEX_SHADER ? "vertex" : "fragment"} shader:`);
    console.log(gl.getShaderInfoLog(shader));
  }
  return shader;
}

function buildShaderProgram(shaderInfo, uniforms, attributes) {
  let program = gl.createProgram();

  shaderInfo.forEach(function(desc) {
    let shader = compileShader(desc.id, desc.type);

    if (shader) {
      gl.attachShader(program, shader);
    }
  });

  gl.linkProgram(program)

  if (!gl.getProgramParameter(program, gl.LINK_STATUS)) {
    console.log("Error linking shader program:");
    console.log(gl.getProgramInfoLog(program));
  }

  var unifrorms_dict = {}
  uniforms.forEach(function(name) {
    uniform_id = gl.getUniformLocation(program, name);
    unifrorms_dict[name] = uniform_id;
  });

  var attributes_dict = {}
  attributes.forEach(function(name) {
    attrib_id = gl.getAttribLocation(program, name);
    attributes_dict[name] = attrib_id;
  });

  return {
    program:program,
    uniforms:unifrorms_dict,
    attributes:attributes_dict
  };
}
buildShaderProgram gets an object contains vertex and fragment shaders, and names of uniforms and vertex attributes. As a result, it returns an object contains built shader program and dictionaries of uniforms and attribute names and IDs.
The next step is the initialisation of all necessary objects. It could be made while page is loading:
// Vertex information
let vertexBuffer;
let vertexCount;

window.addEventListener("load", startup, false);

function startup() {
  initwebGL();

  const shaderSet = [
    {
      type: gl.VERTEX_SHADER,
      id: "vertex-shader"
    },
    {
      type: gl.FRAGMENT_SHADER,
      id: "fragment-shader"
    }
  ];
  const shaderUniforms = [];
  const shaderAttributes = [
    "aVertexPosition",
    "aTexturePosition"
  ];
  shaderProgram = buildShaderProgram(shaderSet,
                                     shaderUniforms,
                                     shaderAttributes);
  console.log(shaderProgram)

  // Here are attributes for 4 vertices (one per line):
  // - The first two numbers are vertex positions.
  // - The second two numbers are texture positions.
  let vertices = new Float32Array([
      -1,  1, 0, 0,
       1,  1, 1, 0,
      -1, -1, 0, 1,
       1, -1, 1, 1
  ]);

  vertexBuffer = gl.createBuffer();
  gl.bindBuffer(gl.ARRAY_BUFFER, vertexBuffer);
  gl.bufferData(gl.ARRAY_BUFFER, vertices, gl.STATIC_DRAW);

  vertexCount = vertices.length / 4;

  animateScene();
}
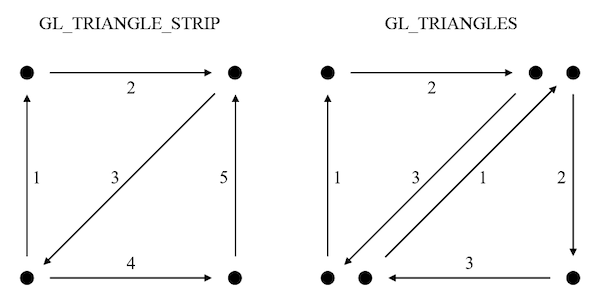
We will draw in the whole window area that is a rectangle. As OpenGL operates with triangles, we need two triangles. But using GL_TRIANGLE_STRIP mode we need only 4 vertices (two of them are common):
So as everything is completed, we can draw our rectangular plane and apply a shader effect on it.
function resize(canvas) {
    // Look up the size the browser is displaying the canvas.
    var displayWidth  = canvas.clientWidth;
    var displayHeight = canvas.clientHeight;

    // Check if the canvas has different size and make it the same.
    if (canvas.width  !== displayWidth ||
        canvas.height !== displayHeight)
    {
        canvas.width  = displayWidth;
        canvas.height = displayHeight;
    }
}

function animateScene() {
    // We need an actual window size for correctly viewport setup.
    resize(glCanvas);

    // Setup viewport and clear it with black non transparent colour.
    gl.viewport(0, 0, glCanvas.width, glCanvas.height);
    gl.clearColor(0.0, 0.0, 0.0, 1.0);
    gl.clear(gl.COLOR_BUFFER_BIT);

    // Select a buffer for vertices attributes.
    gl.bindBuffer(gl.ARRAY_BUFFER, vertexBuffer);

    // Enable and setup attributes.
    gl.enableVertexAttribArray(shaderProgram.attributes["aVertexPosition"]);
    gl.vertexAttribPointer(shaderProgram.attributes["aVertexPosition"], 2,
        gl.FLOAT, false, 4 * 4, 0);
    gl.enableVertexAttribArray(shaderProgram.attributes["aTexturePosition"]);
    gl.vertexAttribPointer(shaderProgram.attributes["aTexturePosition"], 2,
        gl.FLOAT, false, 4 * 4, 2 * 4);

    // Select shader program.
    gl.useProgram(shaderProgram.program);

    gl.drawArrays(gl.TRIANGLE_STRIP, 0, vertexCount);


    window.requestAnimationFrame(function(currentTime) {
        previousTime = currentTime;
        animateScene();
    });
}
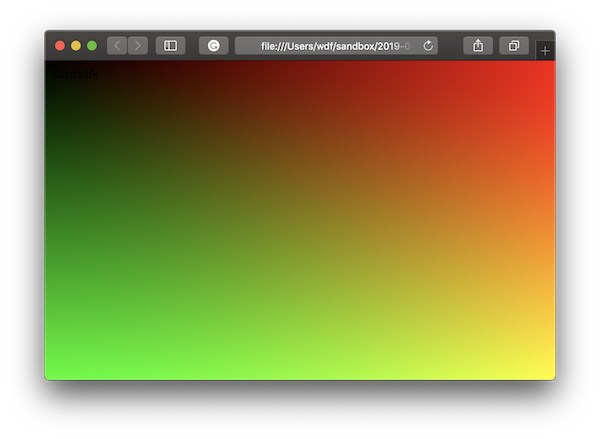
As result we have a page looks like that ([0; 0] point is top left, [1; 1] point is bottom right: